Friday, September 29, 2006

Ikan Bakar Colo-Colo

. Friday, September 29, 2006
0 komentar

Ikan Bakar Colo-Colo

ikan bakar colo colo

Bahan :

  1. 1 ekor (500gr) ikan tongkol besar
  2. 1 sdt garam
  3. 5 sdm air jeruk nipis

Sambal Kenari :

  1. 6 butir bawang merah
  2. 6 buah cabai merah
  3. 2 sdt terasi goreng
  4. 1 sdt garam
  5. 1 sdt gula pasir
  6. 200 gr kenari kupas
  7. 5 sdm air matang

Ketupat Santan :

  1. 500 gr beras, cuci bersih, tiriskan
  2. 2 liter santan dari 3 butir kelapa parut
  3. 6 liter air
  4. 2 sdt garam
  5. Daun kelapa untuk sarang ketupat

Cara Memasak :

Siangi ikan, beri keratan dibadan ikan, lumuri dengan jeruk nipis dan garam, diamkan selama 15 menit, sisihkan

Panggang ikan diatas bara api sambil dibalik-balik hingga matangnya rata. Angkat

Sajikan ikan segera bersama ketupat santan dan sambal kenari

Ketupat Santan : isi sarang ketupat dengan beras setinggi 1/2 bagian. Rebus ketupat dalam santan, air dan garam hingga matang dan ketupat berminyak. Angkat, tiriskan dan potong-potong setelah dingin.

Sambal Kenari : haluskan semua bahan sambal kecuali air. Tambahkan air dan sisa jeruk nipis. Aduk rata


Klik disini untuk melanjutkan »»

Wednesday, September 27, 2006

Bandeng Saus Hoisin

. Wednesday, September 27, 2006
0 komentar

Bandeng Saus Hoisin

bandeng-saus-hoisin

Bahan :

  • 2 ekor (1,5 kg) ikan bandeng segar, siangi, potong dua bagian
  • 5 sdm air jeruk nipis
  • 1/2 sdt garam
  • minyak untuk menggoreng
  • 3 siung bawang putih, memarkan
  • 2 cm jahe, memarkan
  • 2 buah cabai hijau, iris memanjang
  • 100 ml kaldu ayam
  • 2 sdm kecap manis
  • 2 sdm saus Hoisin*
  • 1 sdt minyak wijen
  • 1 sdt gula pasir
  • 1 sdt garam
  • 100 gr wortel kupas, iris sebesar korek api
  • 1 sdm cuka

Cara Memasak :

  • Lumuri ikan dengan air jeruk nipis dan garam, diamkan selama 15 menit, tiriskan
  • panaskan minyak, goreng bandeng diatas api sedang hingga matang dan kekuningan, angkat tiriskan
  • panaskan 2 sdm minyak, tumis bawang putih dan jahe hingga harum. Masukan cabai hijau, aduk-aduk
  • tuangkan kaldu, didihkan. Masukan kecap, saus hoisin, minyak wijen, gula dan garam.
  • Tambahkan wortel dan cuka, aduk-aduk hingga wortel layu
  • masukkan bandeng masak hingga bumbu meresap.

untuk 8 porsi, kalori per porsi : 289

* Saus Hoisin adalah saus khas Cina Selatan, kental, berwarna coklat tua, rasanya pedas manis. Terbuat dari kacang kedelai, cabai dan rempah-rempah. Dijual dalam kemasan botol di Supermarket.


Klik disini untuk melanjutkan »»

Friday, September 22, 2006

black-bottom cupcakes

. Friday, September 22, 2006
0 komentar

black-bottom cupcakes

some of them, however

I’ve always thought one of the best lines in Pulp Fiction is wedged almost unnoticeably early on. Fabienne tells Butch that she wants a pot belly because she thinks they’re sexy on women (though, kind of hilarious, she thinks they make men look oafish). Butch disagrees, tells her she should be happy she doesn’t have one because guys don’t find it attractive. She snips back that she doesn’t give a damn what men like, before musing somewhat sadly that “It’s unfortunate what we find pleasing to the touch and pleasing to the eye is seldom the same.”

And I have to admit, if you swapped “touch” with “taste,” you’d have exactly what was going through my head this weekend as I made a quickie batch of David Lebovitz’s famed Black-Bottom Cupcakes from his Great Book of Chocolate. A spin on the classic devil’s food cake, each cupcake gets a dollop of cheesecake filling which is decked out with chopped bits of bittersweet chocolate before it’s baked into something almost too delicious for words. Since they lack frosting, they’re superbly easy to schlep from one place to another, and should you have time to zap them in the fridge, I think they’re a rare cupcake that actually tastes better cold. And seriously, chocolate and cheesecake? It is beyond my comprehension how everyone does not dream about this flavor contrast. I know we here in the SmitKitch certainly do.

puddles

But, and I’m almost embarrassed to admit this, my inner perfectionist hated them as I was completely unable to get them to look like the peanut butter cup-reminiscent photo. My dollops, they wouldn’t center. My cupcakes, they kept overflowing in the oven. In my attempt to make them into miniature cakes, my first eight had too much filling, and my last eight had none. My baking karma was stunningly off on Friday night, it seemed and I had a asterisked storm cloud over my head all the way until the opening credits of Knocked Up, which if you seriously don’t die laughing from the chairs-in-Vegas scene alone, I just don’t know if we can be friends anymore.

When we got home, my sides hurting from aforementioned cracking up, the ridiculousness of being in a funk because my cupcakes didn’t come out the way I’d hoped had been squarely put in its place. Silly Deb, don’t you know that it only matters that it tastes good? Of course, of course, I muttered, because they were crazy delicious. And I almost sold myself on it, I did. But next time, I still might try a piping bag to get that damned dollop centered.

cupcakes runneth over

Black-Bottom Cupcakes
The Great Book of Chocolate, David Lebovitz

Yield: 12 full-size or approximately 30 mini cupcakes

For the filling:
8 ounces cream cheese, regular or reduced fat, at room temperature
1/3 cup granulated sugar
1 large egg, at room temperature
2 ounces bittersweet or semisweet chocolate, coarsely chopped

For the cupcakes:
1 1/2 cups all-purpose flour
1 cup firmly packed light brown sugar
5 tablespoons natural unsweetened cocoa powder (not Dutch-process)
1 teaspoon baking soda
1/4 teaspoon salt
1 cup water
1/3 cup unflavored vegetable oil
1 tablespoon white or cider vinegar
1 teaspoon vanilla extract

Make the filling: Beat together the cream cheese, granulated sugar, and egg until smooth. Stir in the chopped chocolate pieces. Set aside.

Make the cupcakes:
1. Adjust the rack to the center of the oven and preheat to 350°F (175°C). Butter a 12-cup muffin tin, or line the tin with paper muffin cups.
2. In a medium bowl sift together the flour, brown sugar, cocoa powder, baking soda, and salt. In a separate bowl, mix together the water, oil, vinegar, and vanilla.
3. Make a well in the center of the dry ingredients and stir in the wet ingredients, stirring until just smooth. Stir any longer and you will over mix the batter and end up with less-than-tender cupcakes.
4. Divide the batter among the muffin cups. Spoon a few tablespoons* of the filling into the center of each cupcake, dividing the filling evenly. This will fill the cups almost completely,** which is fine.
5. Bake for 25 minutes, or until the tops are slightly golden brown and the cupcakes feel springy when gently pressed. These moist treats will keep well unrefrigerated for 2 to 3 days if stored in an airtight container.

Two notes:
* If you choose to go mini for these, keep the filling at a tablespoon or less, lest you run out, as, ahem, someone else may have.
** Though I’ve only made this recipe one, and therefore don’t think you should take my input as absolute authority, I’ve got to advise against actually letting these guys fill up. Not an issue if you’re going full-size, but if you go mini, aim for 90 percent full


Klik disini untuk melanjutkan »»

best birthday cake

.
0 komentar

best birthday cake

best birthday cake

Some people find out they’re going to be parents and — you know, after the whole “yay babies!” cheer has simmered down a bit — freak out because they haven’t yet a) traveled the world, b) made their first million, paid off all of their debt and saved up enough for $200 toys for their little snowflake or c) well, grown up yet. But me, I actually had a moment of panic because I hadn’t yet found the perfect yellow layer cake recipe. And apparently — and yes, probably ridiculously — central to my image of the kind of mom I want to be is not to have to turn to a box of Duncan Hines Moist Deluxe Butter Recipe Golden (anyone else ever been perplexed by this wording?) cake mix to get a reliably perfect two-layer celebration cake. It’s the Smitten Kitchen, afterall: People have expectations!

siftingegg shellsmm, batteryellow layer cake

But I’m not knocking on Duncan Hines, or anyone else who — like me — thinks they do a frighteningly good job of making a consistently perfect, moist and plush yellow layer cake. It’s just that it has always been on my agenda to crack the code at home, using the kind of ingredients I’m a little more proud to put my efforts behind. And although I’ve made my share of vanilla layer cakes, such as this delicious one for that wedding cake or this one that everyone needs in their repertoire because it is infinitely memorize-able, I hadn’t yet found The One.

yellow cake layers, coolingmaking chocolate sour cream frostingchocolate sour cream frostingfilling the cake

I also hadn’t found The One in the chocolate frosting department. I wanted something not aggressively buttery or saccharine. Plus easy and drama-free — no tempered egg whites and no praying that the KitchenAid Gods will whiz a sloshy, curdled mess into a smooth and shiny frosting after 20-plus minutes. Those other frostings have their place, but my go-to chocolate frosting needn’t be so complicated.

best birthday cakeeee, best birthday cakebest birthday cake, confetti-edbest birthday cake

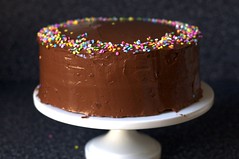
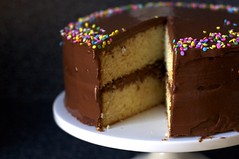
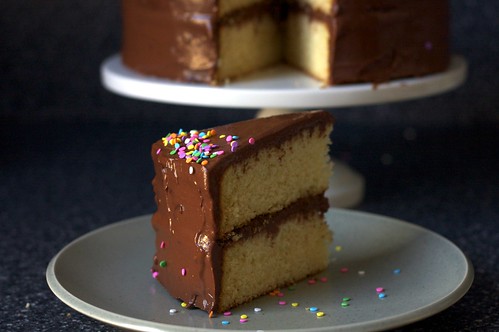
Well, I’m pleased to announce that with a mere 10 weeks left, I’m finally ready to be a mom. Phew, I mean, because we ordered a crib this weekend and everything — I’d hate to cut it much closer! But this is It, this is what I consider the Best Birthday Cake out there: two moist and flavorful vanilla cake layers swathed in a shiny, simple chocolate frosting. The cake has no weird preservatives or unnatural flavorings in it. The frosting has no butter or eggs, and barely any added sweetener. Neither take long to make. The cake doesn’t require a syrup-basting to stay moist and the frosting doesn’t even demand an electric mixer. Just maybe some confetti sprinkles. Er, who am I kidding? Definitely the confetti sprinkles.

mine

Layer Cake Tips: I’ve got lots of them, over here.
Celebration Cakes, previously: More layers, frostings and fillings over here. Tons of ‘em.

One year ago: Chocolate Sorbet
Two years ago: Ratatouille-Style Ratatouille

Best Yellow Layer Cake

Everyone needs a killer yellow cake recipe. This is mine, and dare I say, it should be yours too. It just works. Every time. And if you’ve ever tried a yellow cake mix and wondered why yours didn’t come out that consistently plush (but not freakishly unnatural) at home, dare I say it’s because you hadn’t made this one yet?

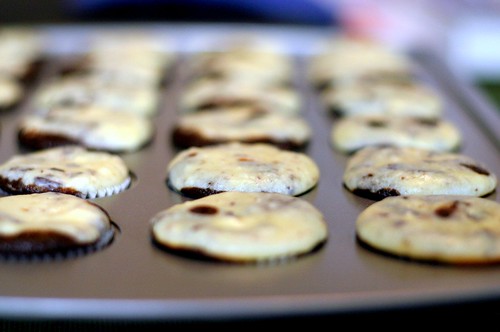
Yield: Two 9-inch round, 2-inch tall cake layers, and, in theory, 22 to 24 cupcakes, two 8-inch squares or a 9×13 single-layer cake (I have yet to audition the cupcakes, shame on me)

4 cups plus 2 tablespoons cake flour (not self-rising)
2 teaspoons baking powder
1 1/2 teaspoons baking soda
1 teaspoon salt
2 sticks (1 cup) unsalted butter, softened
2 cups sugar
2 teaspoons pure vanilla extract
4 large eggs, at room temperature
2 cups buttermilk, well-shaken

Preheat oven to 350°F. Butter two 9-inch round cake pans and line with circles of parchment paper, then butter parchment. (Alternately, you can use a cooking spray, either with just butter or butter and flour to speed this process up.)

Sift together flour, baking powder, baking soda, and salt in a medium bowl. In a large mixing bowl, beat butter and sugar in a large bowl with an electric mixer at medium speed until pale and fluffy, then beat in vanilla. Add eggs 1 at a time, beating well and scraping down the bowl after each addition. At low speed, beat in buttermilk until just combined (mixture will look curdled). Add flour mixture in three batches, mixing until each addition is just Incorporated.

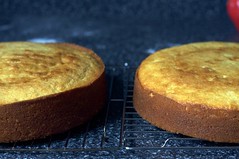
Spread batter evenly in cake pan, then rap pan on counter several times to eliminate air bubbles. (I like to drop mine a few times from two inches up, making a great big noisy fuss.) Bake until golden and a wooden pick inserted in center of cake comes out clean, 35 to 40 minutes. Cool in pan on a rack 10 minutes, then run a knife around edge of pan. Invert onto rack and discard parchment, then cool completely, about 1 hour.

Chocolate Sour Cream Frosting
Adapted from The Dessert Bible

Yes, it’s true: A chocolate frosting recipe without any butter, whipped eggs and barely a modicum of added sugar. Oh, and you don’t even need an electric mixer to make it. What are you waiting for?

Only cooking note: Be sure that your sour cream is at room temperature before you make the frosting. I did not (the original recipe does not warn of this) and just as I poured in the melted chocolate, my super buzzed on my apartment door to check on my always-malfunctioning oven and when I’d returned minutes later, the chocolate had seized a little, leaving little bits (like chocolate chips!) throughout my frosting. These could have been strained out but I decided they made the cake more rustic. Nevertheless, room temperature sour cream — a temperature closer to the tepid chocolate — should allow you to avoid this, ringing doorbells or not.

Makes 5 cups of frosting, or enough to frost and fill a two layer 9-inch cake

15 ounces semisweet or bittersweet chocolate, chopped
1 1/4 teaspoons instant espresso (optional, but can be used to pick up the flavor of average chocolate)
2 1/4 cups sour cream, at room temperature
1/4 to 1/2 cup light corn syrup
3/4 teaspoon vanilla extract

Combine the chocolate and espresso powder, if using, in the top of a double-boiler or in a heatproof bowl over simmering water. Stir until the chocolate is melted. (Alternately, you can melt the chocolate in a microwave for 30 seconds, stirring well, and then heating in 15 second increments, stirring between each, until the chocolate is melted.) Remove from heat and let chocolate cool until tepid.

Whisk together the sour cream, 1/4 cup of the corn syrup and vanilla extract until combined. Add the tepid chocolate slowly and stir quickly until the mixture is uniform. Taste for sweetness, and if needed, add additional corn syrup in one tablespoon increments until desired level of sweetness is achieved.

Let cool in the refrigerator until the frosting is a spreadable consistency. This should not take more than 30 minutes. Should the frosting become too thick or stiff, just leave it out until it softens again.


Klik disini untuk melanjutkan »»

Wednesday, September 20, 2006

Blueberry Buttermilk Pancakes

. Wednesday, September 20, 2006
0 komentar

Blueberry Buttermilk Pancakes

Blueberry Buttermilk Pancakes

"Elise, I have the perfect recipe for your website!" my young friend Audrey (age 10) exclaimed recently. "Blueberry buttermilk pancakes!". Audrey loves making these blueberry pancakes for her family. Easy, fluffy, totally addictive, and by the way, the blueberries are hidden underneath each pancake. Audrey likes to add them individually once the pancakes are poured out on the griddle.

Print Options

Blueberry Buttermilk Pancakes Recipe

Ingredients

Dry ingredients:

  • 2 cups all purpose flour
  • 1/2 teaspoon salt
  • 1/2 teaspoon baking powder
  • 1/2 teaspoon baking soda
  • 2 Tbsp sugar

Other ingredients:

  • 2 large eggs
  • 1/2 cup buttermilk
  • 1 cup milk
  • 3 Tbsp warm melted butter
  • 1 cup blueberries
  • 1 Tbsp of butter or vegetable oil

Method

1 Mix the dry ingredients in a bowl. Mix the eggs, milk and buttermilk in a separate bowl. Add the wet ingredients into the dry ingredients. Mix until the batter just comes together. Add the melted butter. Mix lightly. Fold in the blueberries (or wait to add them once the batter has already been poured on the griddle - this will keep them from bleeding).

2 Heat a flat iron surface - griddle or large pan - to medium high heat. Oil the pan with either a Tbsp of butter or vegetable oil. Ladle the pancake batter onto the griddle to the desired size, usually about 5 or 6 inches wide. When air bubbles start to bubble up to the surface at the center of the pancakes (about 2-3 minutes), use a flat spatula to flip them over. After a minute, peak under one for doneness. When golden or darker golden brown, they are done. Note that cooking the second side takes only about half as long as the first side. And the second side doesn't brown as evenly as the first side. Serve immediately.

Serve with butter and maple syrup.

Serves 3-4.


Klik disini untuk melanjutkan »»